The automated intercompany process in the system will automatically create Due To and Due From entries on the distribution of intercompany transactions. A transaction is deemed intercompany if the Location in the header belongs to a different Legal Entity than a Location in the detail rows. The intercompany entries are added to the distribution after hitting 'Save' and/or 'Approve'.
Create Intercompany Transaction Templates
Intercompany transactions can be saved as templates if these transactions frequently occur. To do this, create a GL Allocation Template with the necessary Source and Destination GL Accounts. Click here to learn more about GL Allocation Templates.
Intercompany Transactions Explained
The Legal Entity form has fields for 'Due From Account' and 'Due To Account' and these are the accounts that will be used in intercompany distributions. The process below describes an example of how this would work.
Assume there are 2 Locations and each is owned by a different Legal Entity (LocA owned by LE1 and LocB owned by LE2). A Vendor delivers $60 of goods to LocA and $40 of goods to LocB but then sends one consolidated invoice for $100. If the invoice is entered at LocA then that means LocB should owe LocA for their $40 portion of the expense. On the invoice, LocA will be the Location in the header and then there would be 2 details rows: 1 for LocA for $60 and 1 for LocB for $40. The distribution without intercompany would be as shown below.
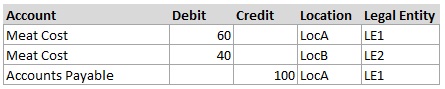
Total debits and credits must balance for each Legal Entity so the example above is out of balance. Total debit for LE1 = 60 and total credit = 100, while total debit for LE2 = 40 and total credit = 0. LE2 needs a $40 credit and LE1 needs a $40 debit to balance out. That is where the Due To and Due From entries come in. Automated intercompany rows will be created to balance out the entry and show that LE2 owes LE1 $40 as shown below.
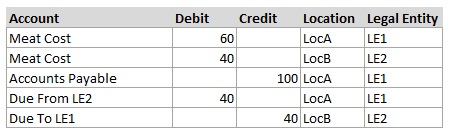
Now debits and credits match for each Legal Entity and the transaction is in balance. The Due To and Due From Accounts were pulled from each respective Legal Entity.
Setting Up Due To/From Accounts
There are 2 methods to choose from when setting up Due To/From accounts on a Legal Entity. Method 2 is more popular.
- Use separate Due To and Due From Accounts for each Legal Entity. This means in our example on LE1, the account name would be 'Due From LE1' in the Due From Account field and 'Due To LE1' in the Due To Account field.
- Pros: This method provides the most detail because each Legal Entity will have their own Due From and Due To Accounts so they will show up separately on a Balance Sheet
- Cons: Requires setting up more accounts in your GL, makes reports like the Balance Sheet longer because they must show each account, and the Due From and Due To Account balances grow over time, which would need an adjusting Journal Entry to cancel them out against each other.
- For example: If the L1 Due To Account grows to a balance of $10,000, then that shows as an Asset on the LE1's Balance Sheet. This will look good, but if it also has a liability of Due From LE1 = $9,000, then the net difference is actually an Asset of $1,000 instead since the rest cancel each other out. Periodically, it will be important to add an adjustment to clear those amounts so they do not grow over time
- (Preferred Method) - Use the same account in both Due To and Due From account fields for each Legal Entity. This means in the example in Method 1, the account named 'Due To/From LE1' would be listed for LE1 in both fields.
- Pros: This makes managing the balances simpler because the same account gets debited and credited, which cancels itself out without the User needing to make manual adjustments to the balance (described in the cons of Method 1 above). This also creates 1/2 the amount of intercompany accounts, which is easier setup and makes reports shorter
- Cons: A little less visibility to see Due To and Due From balances separated out explicitly